Lentil Pakoras
My friend Seema Jain, who is teaching me to cook vegetarian Indian food, brought in the big guns during our last session: her mother-in-law. Mrs. Jain (whom I will henceforth affectionately refer to as MIL) is an accomplished home cook and very generous with her recipes and knowledge.
This recipe for fried lentil fritters, or pakoras, actually has two parts. The first is this crispy-on-the-outside, creamy-on-the-inside pakora recipe, which is traditionally eaten as a savory afternoon tea snack with chutneys. The second, posted here, is called Dahi Vada, uses the fried pakoras and transforms them into a cold dish of soft lentil cakes soaked in yogurt and spices.
The most astounding thing about the pakoras is their texture. They're so light and creamy on the inside that you won't believe they have absolutely no leavening or eggs; they're 100% vegan and gluten-free. The taste is mild and starchy, not unlike potato puffs, but somehow "greener" and fresher. They also keep quite well, so you can fry a big batch several hours ahead of time, them heat them up in the oven right before a party.
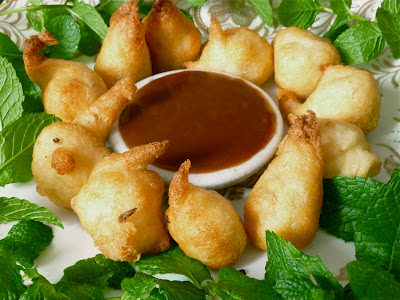
MIL's pakoras are perfectly round, courtesy of her experienced technique as she drops the batter into the oil with her fingers. As much as I tried for a round shape, mine resembled either mushrooms or teardrops, depending on how much water I added to the batter. While MIL's were inarguably prettier, I liked the extra crunch provided by the tips of the teardrops. Either way, the taste isn't effected by the shape, and they were all delicious. Hopefully I'll improve my pakora shapes with practice!
You'll notice that the ingredient list is very short, while the directions are quite long. Don't be deterred by my winded explanation. Much of the directions are simply Frying 101 safety tips and techniques meant to demystify frying for those who aren't that familiar with it. You'll be able to apply what you learn to many other recipes.
To serve 6-8 as a vegetable side or appetizer, you will need:
- 1 cup Urad dal and 1/4 cup yellow Moong dal, both available at Indian grocery stores. Mix together, rinse well, and soak for about 6 hours at room temperature, changing the water 3 times during soaking. MIL says this combination of dals produces the lightest pakora texture.
- Salt
- Water
- Oil for frying. You'll want a neutral, inexpensive oil with a high smoke point (thus, no olive oil.) I suggest canola, safflower, sunflower, grape seed, vegetable, a vegetable blend, or peanut.
- Mint and tamarind chutneys, or other sauces for dipping
Directions:
Rinse the soaked dal well. Diving the dal into two batches and, using a blender with a good motor, puree each batch separately with 1/4 teaspoon of salt and about 1/3 cup cold water. (If you try to puree all the dal at once, it won't achieve a properly homogenous texture. In total, you will be using 2/3 cup water and 1/2 teaspoon salt.) Blend for about 4 minutes or until the batter is very smooth and the texture of hummus. Depending on the quality of your blender, you may find that you need to add additional water, a tablespoon at a time, to get the blades moving through the batter.
Scoop the batter into a large bowl, and sprinkle with a tablespoon of water. Using a large, wide spatula, beat the mixture by hand for about a minute with a rapid folding motion. (You're trying to incorporate more air, similar to beating egg whites or cream.) Your final batter texture should look and feel like white cake batter and have small bubbles that break on the surface. Taste and adjust the salt if necessary.
Heat 2 inches of oil in a 1 quart, heavy-bottomed sauce pan or a similar size, over a medium low flame (You'll want a pan with high sides for safe frying. If you choose a larger pan, you'll end up using a lot more oil than you need for this amount of batter.) I strongly suggest always frying on a back burner, for safety.
While you are heating the oil, continue to beat the batter so that it stays aerated and you see those small bubbles breaking on the surface.
If you have a kitchen thermometer, your oil is ready when it reaches 150 degrees and should go no higher than 175 degrees. However, you don't need a thermometer. The goal is for the pakoras to fry in 4-5 minutes, so they cook through on the inside and slowly brown on the outside.
When the oil is hot, reach into the batter with your fingers and scoop up about 2-3 tablespoons of batter at a time. Now bring your fingers within an inch of the surface of the oil and, using your thumb, gently push the batter off your fingers into the hot oil. If you're nervous about this, you can use a spoon, though I think you'll find that you'll have more control with your hands. Just be very careful not to touch the oil!
You're trying for a round shape. (If you get teardrops, like I did, your batter is probably a little too thin -Don't worry, they'll still taste and look great.) Fry your pakoras in 3-4 batches so as not to crowd them.
The balls will initially sink to the bottom, then rise to the top as they cook. Leave them alone until they rise. Then, using a slotted spoon or spider strainer, gently separate any than have become stuck together. Continue to turn them in the oil until they achieve an even, deep golden color.
Drain on paper towels. Serve immediately, or reheat later in an oven or toaster oven. Serve with chutneys or salsas of your choice. Because of these pakoras' neutral taste, you can use any sauce you like.